Just a test blog
That's all folks!


New devices with higher resolution, higher pixel density and more hardware are coming out everyday and support for old ones is slowly fading with the updates on Operating Systems and the whole browsers layout. It is the perfect time to act quickly and get working on a responsive web design.

What is Responsive Web Design?


Responsive Web Design is a website structure that is easily accessible on every device and is user-friendly. Responsive Web Design is often referred to as 'RWD' -- RWD is vital, every website owner should consider having a responsive template for his/her web design.

You might not know this but a responsive web design can help you hugely with your website reputation and page rank.

What good can a Responsive Web Design (RWD) bring?

Well, In many cases visitors often get annoyed with a 'gully' layout of websites without RWD and leave very quickly. A responsive web design can help those visitors interact with the layout easily without having any trouble which helps your website reputation and visitors often return relying on the fact they will see a clean layout and get what they want without difficulty or effort.

Think of it like this, "Everyone who visits your website might be your customer and if that valuable customer couldn't help himself around your 'store' he isn't going to discover the useful items on display."

As I've mentioned above, 'Responsive web design can help you hugely with your website reputation and page rank' -- It can turn your small amount of audience into a big flock of birds constantly flying towards your way.

What can I do to make my website 'Responsive'?

1. You can get a responsive template for your website. Wordpress Responsive Templates / Blogger Responsive Templates.


2. You can customize your website layout manually and get the responsiveness with the help of CSS3 @media tags. Learn more about @media tags.


3. You can use easy and very reliable services like Webflow to built a responsive layout.


You can either let professionals do it or you can do it yourself, It's not rocket science.

If you don't have any basic knowledge of Web Designing, I recommend you go over to w3schools.com and learn.

A Responsive Web Design is 'built' or 'put together' wtih the help of three major languages, HTML, CSS and JavaScript. CSS is the main course of responsiveness, with 'CSS Media Types' a website can have different layouts for mobile / tablet / large screen.

How it works

The Responsive Web Design depends or focuses on the screen size of the device that It's displayed on. When the screen is size is changed or zoomed in/out a rule or 'query' is declared and some objects on the screen are removed or re-sized to fit the smaller display. For example:


A simple <meta> tag can determine the screen size of the device by stating the following code into the website's <head> section:

<meta name="viewport" content="width=device-width"/>

By defining this code, the layout will act according to the screen's initial size.
(Note: There's a glitch in iOS device where the device doesn't recognize responsive templates if the code above is not not declared in the website's html head.)

Conclusion

So, is RWD worth it? Yes, it is. If you are thinking of getting a website or already have one, I recommend you to pick a responsive layout for it if you want it to succeed.

Many people neglect the importance of responsive web design, they are making a big mistake, all the successful and popular websites you see today have a responsive layout because they value their visitor and don't want anyone to have any problem visiting their website.


If you're reading this, you must know how to program in C++, If not read my C++ - Introduction Here first and then continue on with this tutorial.

The purpose of this tutorial just to keep you in practice, if you're learning C++ then this could be a good practice. Calculations in C++ are quite like many other languages, you could simply add/subtract/multiply or divide by their defined symbols ( + - * / ).

Making the Program:

To get started, first create a simple C++ structure:

#include <iostream>

using namespace std;

int main()
{
    return 0;
}

Now create 3 variables in the 'int main()' function area:

#include <iostream>

using namespace std;

int main()
{
    int a;
    int b;
    int sum;


    return 0;
}

And add 2 'cout' and 'cin' properties. Point 'cin' to 'a' and the second 'cin' to 'b' variable. When user puts in anything in any of those 'cin' properties, the variable's value will become what the user has put in.

#include <iostream>

using namespace std;

int main()
{
    int a;
    int b;
    int sum;

    cout << "Enter a number: ";
    cin >> a;

    cout << "Enter another number: ";
    cin >> b;


    return 0;
}

Now, using our third variable 'sum' we are going to add the value of  'a' and 'b'.

#include <iostream>

using namespace std;

int main()
{
    int a;
    int b;
    int sum;

    cout << "Enter a number: ";
    cin >> a;

    cout << "Enter another number: ";
    cin >> b;

    sum = a + b;

    return 0;
}

And to display the total, we will 'cout' the value of  'sum' and end the program there.

#include <iostream>

using namespace std;

int main()
{
    int a;
    int b;
    int sum;

    cout << "Enter a number: ";
    cin >> a;

    cout << "Enter another number: ";
    cin >> b;

    sum = a + b;
    cout << "Total: " << sum << endl;

    return 0;
}

And.. your calculator is 'made'. (I've been watching a lot of Italian movies)

Testing the Program:

when you compile and run, It'll ask you to enter a number, enter one:


Enter another number:


And it will count:


Yay! It works!

I recommend you to play around with the values, maybe add a subtract option or divide the total value. You could do all that very easily but you just have to stick around for a while in your compiler program.

If you have any question or anything, Please let me know down below.
I recommend you read 'How To Create Your Own Android App' before continue reading this or this might not make any sense to you.

Running the Android Virtual Device Emulator:

Open Eclipse and load up your recent android project. (If you don't know how to or what is eclipse, read This)

Now goto Run > Run Configurations


And select the 'Target' tab right beside the 'Android' tab and open the AVD Manager.


Select 'Device Definitions' tab and select a device according to your PC/MAC specifications, ( If you select a more powerful or higher resolution device than your screen resolution, the emulator might crash ) then click 'Create AVD', and click OK on the next screen.


In your 'Android Virtual Devices' tab a new device will be create. Select your device and Click on 'Start' and then 'Launch' and your virtual device will be launched.


Making an App and Testing it:

Minimize your Android Virtual Device and Close AVD Manager and Run Configurations.

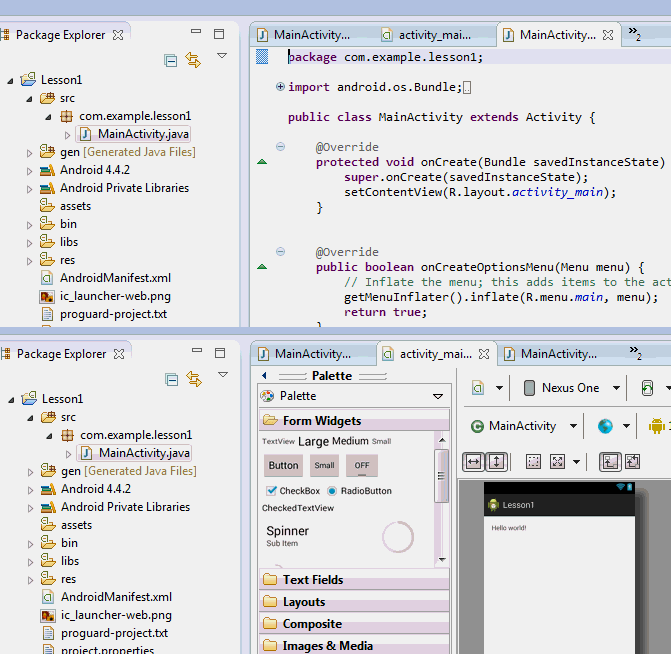
Select your project from the projects tab and select 'main_activity.xml' and switch to 'Graphical Layout'.


Now add anything you like to your app, like a button or maybe some text.


You can change the text by selecting it and changing the 'Text' property on the right.


Now make sure you have your Project name selected on the left and click on the small play button > Run as > Android Application.


In a moment or it might take a minute or two (depending on your PC/MAC speed) your First Android App will be live on your Android Virtual Device.

I recommend you to play around with it, add buttons, add swipes, add your own text. You will learn a lot of stuff!

If you have any question or anything, Please let me know down below.

Android is Not one of the most popular Operating Systems but Is the most popular mobile Operating System up to date. Android is running on more than 192 million devices world-wide and has more than 1.2 million Apps on App Store.

I believe if you have the creativity and the right set of skills, you could become the next Android App Millionaire.

So, to get started with our tutorial, follow the steps below.

Collecting the files:

You need to download 2 applications to get started working on your Android App,

1. Android SDK (for MAC OS X or Linux you need to scroll down and expand 'Download For Other Platforms').

2. Eclipse (you could see the OS X and Linux version on the right).

After the download is complete, Extract Android SDK and Eclipse into 2 separate folders. (I like to keep my stuff in order and I recommend you should too as this could get a little messy).

Getting the files ready:

Go into eclipse folder run eclipse executable, when it asks for a folder location, select that folder where you want to store your Eclipse data/saves.


When eclipse has successfully opened, select 'WorkBench' on the uper right corner and close it. Continue to Android SDK.

Run 'SDK Manager', When it opens you need to select 3 packages and leave other selections as they were:


Then click on Install and accept anything that comes up. Wait for it to download and when the download it complete, close it.

Now we have to update eclipse plugins,

Open Eclipse again goto Help > and Select 'Install New Software...'


On the next screen, in the 'Work with' input the following url ( https://dl-ssl.google.com/android/eclipse ) and click 'Add'. After it fetches the files, click on 'Select All' and then click 'Next'.


Ignore the next screen and click next again. After that accept the terms of license agreements and click finish. Let it download and install new plugins, ( if any security notification comes up just click ok ).


After the installation is finished and eclipse has restarted, a notification will show up 'Location of Android SDK has not been setup in the preferences.'


Click 'Open Preferences' and browse to the folder where you have extracted Android SDK files and click OK.

Now that the location has been set, goto Files > New > select 'Project'.


 On the next screen, expand 'Android' and select 'Android Application Project' and click next.


Now you need to name your application, name it wisely because this name will appear in the App Store when you publish it. Leave other stuff as they are and click next and again next, then select your custom icon, if you'd like to change that, otherwise click next and again next and finish.

Then you will have your project name appear in the 'Package Explorer' on the left and that's where you will do all the work.

One small notice before I wrap this up, if you switch the tab to 'active_main.xml' you could see the graphics interface for your app.


Next tutorial: Creating a simple android app and testing it.

If you have any questions or anything, Please let us know down below

If you don't have any knowledge of PHP, I urge you to read my PHP - Introduction and How To Set Up a Local Server To Test PHP Scripts first and then get on with this tutorial.

To make a calculator, you need to make a process.php file along with your index.php:


Then, create a form in your 'index.php' with an action event pointing to your 'process.php' file and in the form create 4 text inputs and a submit button:

<form action="process.php" method="post">

Add <br/>
<input name="num1" type="text"><br/>+<br/>
<input name="num2" type="text"><br/>
<input type="submit"><br/><br/>
Subtract <br/>
<input name="num3" type="text"><br/>-<br/>
<input name="num4" type="text"><br/>
<input type="submit">

</form>

Now open your 'process.php' and follow/copy the code below:

<?php

$num1 = $_POST["num1"];
$num2 = $_POST["num2"];
$sum = $num1 + $num2;
echo "Add equal: " . "$sum". "<br/>";

$num3 = $_POST["num3"];
$num4 = $_POST["num4"];
$sum1 = $num3 - $num4;
echo "Subtract equal: " . "$sum1";

?>

What's happening in the code above is that num1-num4 variables are fetching whatever is being put in the inputs of the form in index.php with help of a special variable '$_POST' and with a simple $sum, 'num1-num4' values are being added and subtracted and send out to the screen with 'echo' commands.

I may not have described this the best way but that's basically what's happening in that code.

Now if you are clever enough (which I'm not) you can use this 'fetching' and 'calculating' PHP code to do alot more than what I've shown here.

If you want to get my version of index.php (as shown in the image) click Here.

If you have any questions or anything, Please let us know down below.

Well, you must have seen this on some website that when you hover over some object which has text or anything written in it the text changes along with the object visualization, How is that happening? What magic is behind that effect? Maybe I might've exaggerated this a little bit but it is no 'biggie'.

These are rather one of the 'cool' properties of JavaScript, if you have enough imagination left in you, you could do some very unique and powerful stuff with these tricks.

Let's get to what this post is originally about, first you should have some very basic knowledge of JavaScript and CSS, if you don't have any I recommend you read my JavaScript Introduction Here or search around the web for tutorials.

So, first How do you change HTML text with JavaScript? Here's an example:

Create an <h3> heading tag in HTML body and give it an id of 'h3style', then create an JavaScript event of OnMouseOver and target that to the function "changeText();".

<h3 id="h3style" OnMouseOver="changeText();">Rollover</h3>

Then create a <script type="text/javascript"> tag in your HTML head and put the following code in it:

<script type="text/javascript">

function changeText()
{
  document.getElementById("h3style").firstChild.nodeValue="Bored";

                return true;
}


</script>

What's happening above is the element id 'h3style' is being called and it's 'firstChild' which is originally the first text is being called to change it's nodeValue (nodeValue is the main value like in this case it was 'Rollover' and when the mouse hovers over it it says 'Bored')

You could create an OnMouseOut event and make it change to something else when the mouse hovers out.

And that's how you change HTML text with JavaScript. You can target divs, tables or as far as I know this works with absolutely any HTML tag.

Next, How do you change CSS Properties with JavaScript? Here's how:

from what you just created above in 'How do you change HTML text with JavaScript?' it already has an an element of <h3> with and id of 'h3style', we will use it's id to create a CSS property.

Create a CSS h3style property and give it a color change effect, like below:

    <style type="text/css">
    #h3style {
    color: brown;
    }
    </style>

Now, goto your JavaScript section and we're going to add new document.GetElementById to the changeText(); function you've created above, add the bolded line from below to the functions.

UPDATE* You could also use '.innerHTML' instead of targeting '.firstChild'. Example: "document.getElementById("h3style").innerHTML="Bored";

function changeText()
{
  document.getElementById("h3style").style.color="gray";
  document.getElementById("h3style").firstChild.nodeValue="Bored";
  return true;
 }

Test the whole thing in your browser and it'll work as shown.

What's happening above is again it's calling the 'h3style' id and after that the CSS style color is being called to change to 'gray' from 'brown'.

This is quite simple, you just need to call for style with .style before the CSS property that you want to change and then you can add padding, border, background, font-size, transform and much more to it!

If you have any question or anything, Please let us know down below.
Introduction:

PHP is a server-side programing language used for general purpose programming and web development. It's creator Rasmus Lerdorf created PHP in 1995 and since then it has been installed in 244 million websites and 2.1 million web servers.

Some things that you should aware of about PHP is that it can directly be embedded into main HTML documents, and PHP code is impossible to read from client-side because PHP code runs on the server and only the result is send to the client.

How To Set Up a Local Server To Test PHP Scripts:

So, how do you run PHP scripts on your browser and test out some of it's cool features? Well, it's not quite like HTML or JavaScript where you can just create their file extension documents (.html and .js) and implement your code.

PHP scripts run only on server which has PHP plugin installed, so you first have to make a server, follow the steps below:

First, for the server, I recommend you download and install WAMP for Windows and MAMP for Mac. I use WAMP because I have a windows PC, so don't get confused with WAMP and MAMP they're both identical softwares with same functions.

Second, after you've installed WAMP, run it and left click on it's icon in the tray bar and select 'localhost' from the top:


A page will open looking something like this:


That is just to make sure if you've correctly installed the local webserver.

Third, now you have to locate the local directory where all the .php files will be stored to run, for the again left click on WAMP icon in tray and select 'www directory':


If something goes wrong and it gives an error, goto you wamp directory in "C:\wamp\www" and open the 'www' folder, you should have all the server files there.

Fourth, you should have a 'index.php' inside the root directory, open it with Notepad++ or just simple notepad. (though, I recommend you use notepad++, it's quite helpful)

Fifth, delete all the text in 'index.php' and copy & paste the code below in there:

<html>
<head>
<title>PHP Script</title>
</head>
<body>

<?php

   echo "Hello, World";

?>

</body>
</html>

Sixth, now save it (ctrl+s) and goto your wamp icon again the tray and open 'localhost' or if you already have it open, refresh it and it shall say "Hello, World!".

Now I'm going to explain some very basics of what's happening above, first you have your basic HTML coding, the <html>, <head> and <body> tags, and in the body you have the PHP magic happening,

PHP is recognized, or starts with "<?php" tag and ends with "?>" tag, as I've mentioned above, PHP script can be written anywhere in the HTML document but the document should be on the server with PHP installed.

After '<?php' tag I've created an 'echo' command which is putting out "Hello, World" and ending with a semi-colon, remember semi-colons are vital when writing PHP codes, if you forget to put one semi-colon in your script, it won't work.

If you have any questions or anything, Please let us know below.
Introduction:

C++ is programming language. It is regarded as an intermediate-level language as it comprises both high-level and low-level language features.

C++ has been around from quite a while now, It's founder Bjarne Stroustrup started working on it in 1979 and by 1983 it was out and being used to program. Many popular programs you use today are written on C++.

How to make a program with C++ that puts out "Hello, World!"

First, you need to download and install a compiler.
(A compiler is basically a reader which is gonna understand your c++ code and convert it into machine language so your computer can understand it.)

For the compiler, I recommend you download CodeBlocks, It's the best yet compiler for C++.

Second, run CodeBlock and create a project:


Then select 'Console Application' from the list and click Go.


Just click Next on the next screen, after that make sure C++ is selected on the next screen and click next, then you gotta name your project, just name it anything you like and select the location where you like to store the project files and click next.

After that, just ignore the other screen and click Finish. You can then see your project listed on the left size of the program under 'Projects' tab. Expend it and select the 'main.cpp'

It'll have some code in it, just remove that code and copy & paste the code below in there:

#include <iostream>

using namespace std;

int main()

{
    cout << "Hello, World!";
    return 0;
}

Congratulations! You've just created your first program!

Now to run it, you should see these three button on on the top  click on the third one which says Build and Run and your program will run.

Now, I'm going to cover some very basics of what's happening above

I'm using a 'cout' function to send out or display the message "Hello, World! in the program. 'cout' is normal function which tells the compiler to do or display the following things.

You must've also noticed 'using namespace std;' what is that? well, the best way to put it is that 'std' is set of functions or more like a library of function which includes 'cout', 'std' contains the properties of 'cout', the program wouldn't recognize 'cout' if  'using namespace std;' wasn't used.

and the whole program is stopped by the command 'return 0;' return is like a stop sign, if it weren't there, the program will loop.

That's it! If you have any question or you want to spot out any mistakes, please let us know below.


JavaScript is a very simple and delicate language. It is sometimes called a "Client-Side Scripting Language" because it runs on your browser and process all the data on your computer instead of doing it on the server like PHP.

It has been around from a while now. More than 3 Billion devices run JavaScript and supports JavaScript programs. It's fairly easy to write JavaScript codes but you should first be familiar with how it works.

How JavaScript Works:

When you open a Webpage which has JavaScript on it and it is set do a certain JavaScript task as soon as the page loads, what happens is that the written JavaScript code is first fetched by the browser and then processed very quickly in under a milisecond and the output is send to the screen. Your browser is the interpreter and acts accordingly.

How to Create an Alert Message with JavaScript:

Here's an example of a very basic JavaScript coding, the following code is going to generate an alert saying Get Funky.

Remember, JavaScript codes are written between <script> tags or in a separate .js file which is connected to the main html file.

<script type="text/javascript">
alert("Get Funky");
</script>

What's happening above is a simple alert command is being run which is causing the browser to display the message "Get Funky" (without quotes, quotes are part of the language).

Try the above code in this Online HTML Editor. Notice as soon as you are gonna post the code it'll give you an alert.

It's as simple as that to create those annoying alerts, that's why you see too many of those online.